The windows operating system from Microsoft is widely used in most of the computers through the whole world. Windows 10 is the latest version of this operating system that contains many smart features to simplify the working of the user. Microsoft has introduced automatic updates feature that doesn’t require any permission for downloading or installation of updates. But many users do not like this feature because of various reasons. That is why people are searching different methods to disable windows 10 automatic updates. This article contains all important information regarding this issue.
![How to Disable Windows 10 Automatic Updates [Best Ways]](https://codeablemagazine.com//wp-content/uploads/2017/05/windows10.jpg)
Automatic updating of windows 10 is beneficial because latest updates are very important to keep the PC secure from many potential threats. Updates provided by Microsoft are helpful to make a computer system less vulnerable to attacks. But in some cases, it becomes a problem such as when you have limited internet data for a task and windows updates will start consuming it. Also, many users want full control over every activity of their PC so they need to disable windows 10 automatic updates. Like all previous versions, this edition of windows has not any option to disable updates directly from the taskbar. That is why a complete procedure to disable this automatic function is mentioned below:-
How to Disable Windows 10 Automatic Updates [Best Ways]
Change the group policy:
The group policy changing method will be helpful if you are using professional, education or enterprise version of windows 10. Follow this procedure to disable windows 10 automatic updates in few simple steps:-
- Open the run command by pressing windows key + R and type “gpedit.msc”.
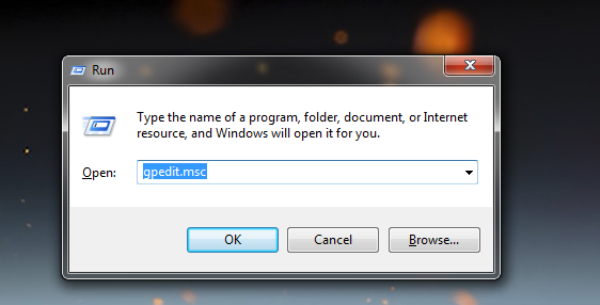
- Press enter and you will be directed to local group policy editor where computer configuration option will be shown on the left side.
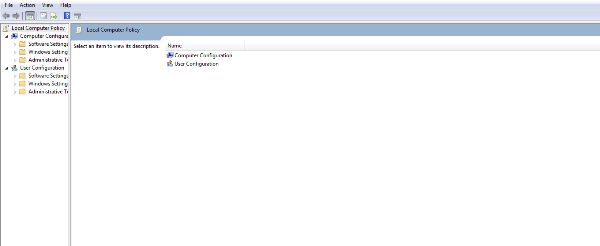
- Click on it to expand and follow administrative templates> windows components> windows updates.
- In the right side of these windows, a list will appear where you need to click on “configure automatic updates” option.
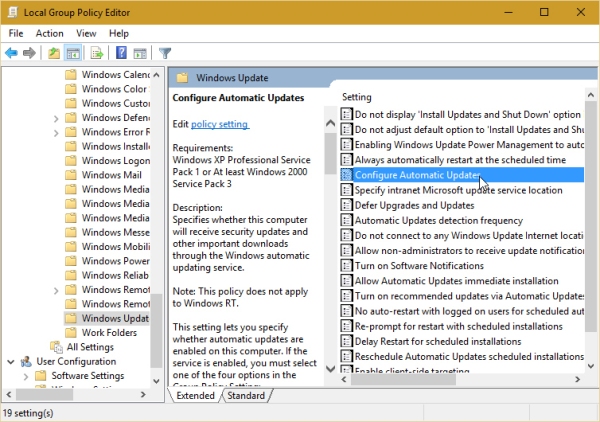
- A dialog box will appear where you need to click on enable the option on the left side.
- Now in the options list, various options to configure automatic updates will appear such as:-
- Notify for download and notify for install.
- Auto download and notify for installation
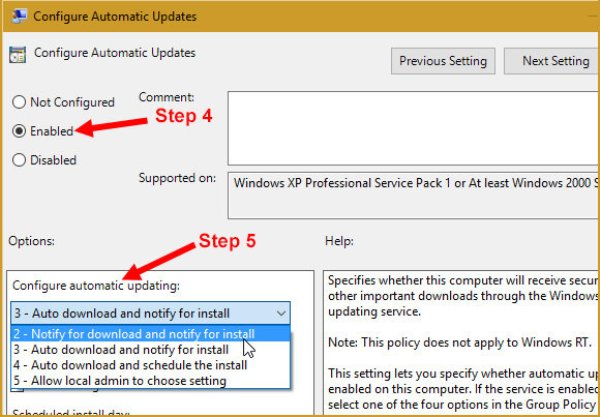
and many other options. Choose any of the suitable configurations and click ok to disable Windows 10 automatic updates. This method is very easy to follow and it doesn’t require any deep technical knowledge.
By using registry
Another method to prevent your windows 10 from automatic updates is using registry settings. But before applying this method, remember one thing that the operational activities done through registry will be irreversible. Here is the whole procedure through which you can block the automatic updates:-
- First of all press win+ R key to run command prompt.
- In the command prompt space, you have to type “regedit” and after clicking on ok button, the registry settings menu will appear.
- Here you need to follow the following path to access the settings:-
HKEY_LOCAL_MACHINE\SOFTWARE\Policies\Microsoft\Windows
- Now go to the windows folder and right click on it. Move the cursor to “new” and click on key option.

- Rename the newly created key as “windows update” and press enter to create.
- Now right click on the new key, drag cursor to new and click on “key” option again.
- Here you will have to rename the newly built key as “AU” and press enter to proceed.
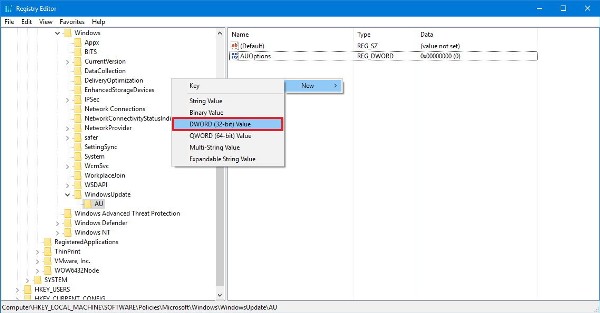
- Now right click on the new key> select new> DWORD (32-bit) Value.
- Again create a new key as naming it “AUOptions” and hit enter.
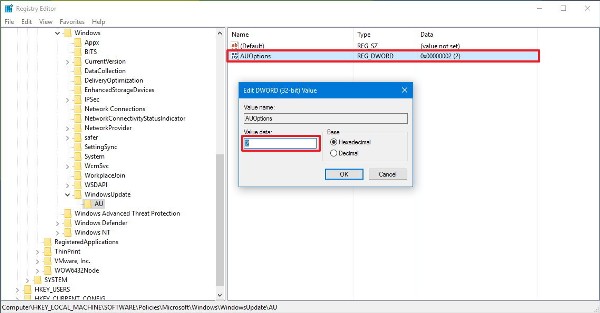
- Change the values of newly created key by double click on it using following options:-
“Notify for download and notify for install.”
“Auto download and notify for install.”
“Auto download and schedule the install.”
“Allow local admin to choose settings.”
Select any of the value and click ok, close the registry. Choosing “Notify for download and notify for install” is a better option because it will prevent automatic updating and inform if any update is available.